


一、课件
二、课后习题
三、答案
2020年7月26号18点38分更新:优化代码逻辑
1.
import tensorflow as tf

x = tf.constant([[90, 80, 70]], dtype=tf.float32)  # [1, 3]


def cal_mat():
    # 矩阵相乘
    w = tf.constant([[0.1, 0.2, 0.3, 0.4], [0.2, 0.3, 0.4, 0.5], [0.3, 0.4, 0.5, 0.6]])
    b = tf.constant(0.1)
    y = tf.matmul(x, w) + b
    return y


def cal_dense():
    # dense计算
    kernel = [[0.1, 0.2, 0.3, 0.4], [0.2, 0.3, 0.4, 0.5], [0.3, 0.4, 0.5, 0.6]]
    bias = 0.1
    y1 = tf.layers.dense(x,
                         units=4,
                         kernel_initializer=tf.constant_initializer(kernel),
                         bias_initializer=tf.constant_initializer(bias))
    return y1


with tf.Session() as sess:
    dense = cal_dense()
    cal = cal_mat()

    sess.run(tf.global_variables_initializer())
    print(sess.run(dense))
    print(sess.run(cal))
2.
import tensorflow as tf
# 存储
def save(sess):
# tf.summary.FileWriter('./checkpoint', sess.graph)
saver = tf.train.Saver()
saver.save(sess, "./checkpoint/MyModel")
pass
# 加载 计算
def load_cal(sess, dicts):
saver = tf.train.import_meta_graph('./checkpoint/MyModel.meta')
saver.restore(sess, tf.train.latest_checkpoint('./checkpoint'))
sess.run(tf.global_variables_initializer())
graph = tf.get_default_graph()
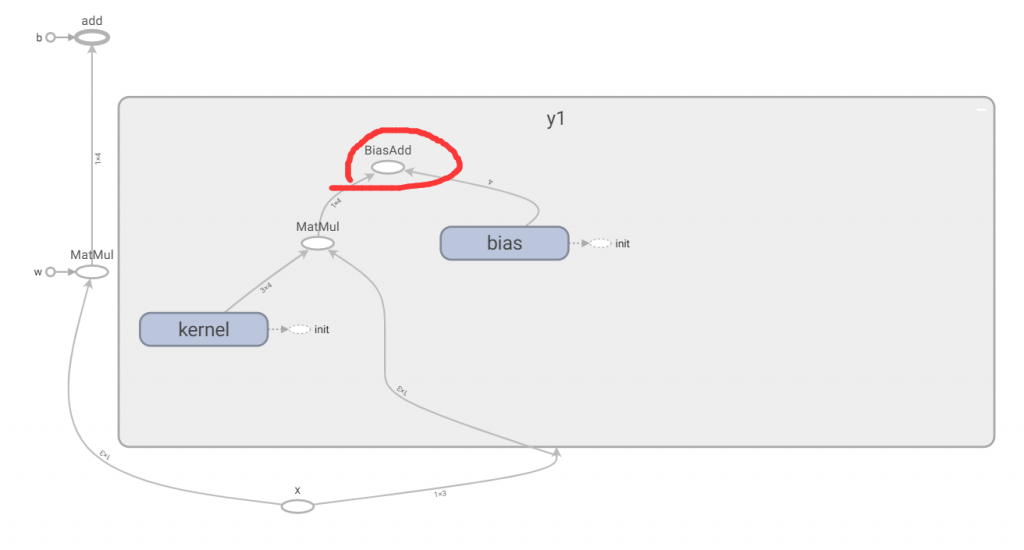
y1 = graph.get_tensor_by_name("y1/BiasAdd:0")
print(sess.run(y1, dicts))
# 乘法计算
def cal_mat(x):
# 矩阵相乘
w = tf.constant([[0.1, 0.2, 0.3, 0.4], [0.2, 0.3, 0.4, 0.5], [0.3, 0.4, 0.5, 0.6]], name="w")
b = tf.constant(0.1, name="b")
y = tf.matmul(x, w) + b
return y
# dense计算
def cal_dense(x):
# dense计算
kernel = [[0.1, 0.2, 0.3, 0.4], [0.2, 0.3, 0.4, 0.5], [0.3, 0.4, 0.5, 0.6]]
bias = 0.1
y1 = tf.layers.dense(x,
units=4,
kernel_initializer=tf.constant_initializer(kernel),
bias_initializer=tf.constant_initializer(bias),
name="y1"
)
return y1
with tf.Session() as sess:
x = tf.placeholder(tf.float32, shape=[1, 3], name="x") # [1, 3] [[90, 80, 70]]
dicts = {x: [[90.0, 80.0, 70.0]]}
dense = cal_dense(x)
mat = cal_mat(x)
sess.run(tf.global_variables_initializer())
# print(sess.run(dense, dicts))
# print(sess.run(mat, dicts))
# 保存函数
save(sess)
dicts = {x: [[23.0, 68.0, 77.0]]}
load_cal(sess, dicts)
四、命名规则-加0
1. 冒号后面加0 指的是 该张量的第几个输出分支。 我们在通过 graph.get_tensor_by_name来获取这个张量值(也就是它的输出)的时候,一定要加冒号和数字的,只不过大部分tensor只有一个output,所以我们看到的大部分都是 :0
所以,我们在定义tensor的时候,应该也需要点名name 比如 a = tensor.Variable( tf. normal...[] , name = 'a')

2.
它与底层API中张量的表示有关。张量是一个与某些操作的输出相关的值。在变量的情况下,有一个输出为Variableop。一个op可以有多个输出,因此这些张量被引用为<op>:0、<op>:1等。例如,如果使用tf.nn.top_k时,该op会创建两个值,因此可以看到TopKV2:0和TopKV2:1
a,b=tf.nn.top_k([1], 1)
print a.name # => 'TopKV2:0'
print b.name # => 'TopKV2:1'
五、保存和加载模型和数据
定义数据
import tensorflow as tf

#Prepare to feed input, i.e. feed_dict and placeholders
w1 = tf.placeholder("float", name="w1")
w2 = tf.placeholder("float", name="w2")
b1= tf.Variable(2.0,name="bias")
feed_dict ={w1:4,w2:8}

#Define a test operation that we will restore
w3 = tf.add(w1,w2)
w4 = tf.multiply(w3,b1,name="op_to_restore")
sess = tf.Session()
sess.run(tf.global_variables_initializer())

#Create a saver object which will save all the variables
saver = tf.train.Saver()

#Run the operation by feeding input
print sess.run(w4,feed_dict)
#Prints 24 which is sum of (w1+w2)*b1

#Now, save the graph
saver.save(sess, 'my_test_model',global_step=1000)
加载数据
import tensorflow as tf

sess=tf.Session()
#First let's load meta graph and restore weights
saver = tf.train.import_meta_graph('my_test_model-1000.meta')
saver.restore(sess,tf.train.latest_checkpoint('./'))


# Access saved Variables directly
print(sess.run('bias:0'))
# This will print 2, which is the value of bias that we saved


# Now, let's access and create placeholders variables and
# create feed-dict to feed new data

graph = tf.get_default_graph()
w1 = graph.get_tensor_by_name("w1:0")
w2 = graph.get_tensor_by_name("w2:0")
feed_dict ={w1:13.0,w2:17.0}

#Now, access the op that you want to run.
op_to_restore = graph.get_tensor_by_name("op_to_restore:0")

print sess.run(op_to_restore,feed_dict)
#This will print 60 which is calculated
注意事项:
全连接层的加载需要查看tensorboard具体的参数名字(例子见目录二中的答案)
# 加载所有的tensor
names = ([tensor.name for tensor in tf.get_default_graph().as_graph_def().node])
print(names)
# 使用tensorboard 查看需要加载的模型具体名字,再进行加载
y1 = graph.get_tensor_by_name("y1/BiasAdd:0")
六、CNN初体验
mnist数据集
数据下载
import tensorflow as tf
from tensorflow.examples.tutorials.mnist import input_data

#读取mnist数据集
mnist = input_data.read_data_sets("MNITS_data/",one_hot=True) #这里one_hot为True其实就是说每一条数据对应的标签是一个向量
sess = tf.InteractiveSession() #创建session

#函数声明部分
def weight_variable(shape):
    initial = tf.truncated_normal(shape,stddev=0.1)
    return tf.Variable(initial)

def bias_variable(shape):
    initial = tf.constant(0.1,shape=shape)
    return tf.Variable(initial)

# tf.nn.conv2d中输入x的shape是[batch, in_height, in_width, in_channels],
# 滤波器的shape是[filter_height, filter_width, in_channels, out_channels],
# strides的shape是[batch, #in_height, in_width, in_channels],其中strides[0]=strides[3]=1.
def conv2d(x,w):
    return tf.nn.conv2d(x,w,strides=[1,1,1,1],padding='SAME')

#ksize的每一维数值是与输入的每一维相匹配的
def max_pool_2x2(x):
    return tf.nn.max_pool(x,ksize=[1,2,2,1],strides=[1,2,2,1],padding='SAME')

#占位操作,定义输入输出、dropout操作的丢弃率的数据类型
xs = tf.placeholder(tf.float32,[None,28*28])
ys = tf.placeholder(tf.float32,[None,10])
keep_prob = tf.placeholder(tf.float32)

#输入
x_image = tf.reshape(xs,[-1,28,28,1])

#第一层卷积层
w_conv1 = weight_variable([5,5,1,32])
b_conv1 = bias_variable([32])
h_conv1 = tf.nn.relu(conv2d(x_image,w_conv1)+b_conv1)
h_pool1 = max_pool_2x2(h_conv1)
print(h_pool1)

#第二层卷积层
w_conv2 = weight_variable([5,5,32,64])
b_conv2 = bias_variable([64])
h_conv2 = tf.nn.relu(conv2d(h_pool1,w_conv2)+b_conv2)
h_pool2 = max_pool_2x2(h_conv2)
print(h_pool2)

#平坦化
flat = tf.reshape(h_pool2,[-1,3136])

#第三层全连接层
w_fc1 = weight_variable([3136,1024])
b_fc1 = bias_variable([1024])
h_fc1 = tf.nn.relu(tf.matmul(flat,w_fc1)+b_fc1)
print(h_fc1)

#Dropout操作
keep_prob = tf.placeholder(tf.float32)
h_fc1_drop = tf.nn.dropout(h_fc1,keep_prob)

#第四层输出层,使用多分类器softmax
w_fc2 = weight_variable([1024,10])
b_fc2 = bias_variable([10])
y_conv = tf.nn.softmax(tf.matmul(h_fc1_drop,w_fc2)+b_fc2)
print(y_conv)

#定义损失cross_entropy = -tf.reduce_sum(ys*tf.log(y_conv))
cross_entropy = tf.reduce_mean(-tf.reduce_sum(ys*tf.log(y_conv),reduction_indices=[1]))

#优化
train_step = tf.train.GradientDescentOptimizer(0.0001).minimize(cross_entropy)

#精确度
correct_prediction = tf.equal(tf.argmax(y_conv,1), tf.argmax(ys,1)) #tf.equal返回值true或falae
accuracy = tf.reduce_mean(tf.cast(correct_prediction,tf.float32))

#初始化全部变量
tf.global_variables_initializer().run()
#迭代训练
for i in range (2000):
    batch = mnist.train.next_batch(50)
    train_step.run(feed_dict={xs:batch[0],ys:batch[1],keep_prob:0.5})
    #训练迭代美每100次就用训练数据打印输出精确度,使用训练集数据检测一下模型的训练效果
    if i%1 == 0:
        train_accuracy = accuracy.eval(feed_dict={xs:batch[0],ys:batch[1],keep_prob:1.0})
        print("step %d,training accuracy %g"%(i,train_accuracy))

#测试,使用测试数据检测模型的效果,打印输出精确度
print("test accuracy %g"%accuracy.eval(feed_dict={xs: mnist.test.images,ys:mnist.test.labels,keep_prob:1.0}))
七、eval函数
eval() 其实就是tf.Tensor的Session.run() 的另外一种写法。你上面些的那个代码例子,如果稍微修改一下,加上一个Session context manager:
with tf.Session() as sess:
  print(accuracy.eval({x:mnist.test.images,y_: mnist.test.labels}))
其效果和下面的代码是等价的:
with tf.Session() as sess:
  print(sess.run(accuracy, {x:mnist.test.images,y_: mnist.test.labels}))
但是要注意的是,eval()只能用于tf.Tensor类对象,也就是有输出的Operation。对于没有输出的Operation, 可以用.run()或者Session.run()。Session.run()没有这个限制。
八、CNN案例优化,交叉熵—2020年8月3日更新
# 定义损失cross_entropy = -tf.reduce_sum(ys*tf.log(y_conv))
# cross_entropy = tf.reduce_mean(-tf.reduce_sum(ys * tf.log(y_conv), reduction_indices=[1]))
# 这里改用tf自带函数计算损失函数
cross_entropy = tf.reduce_mean(tf.nn.softmax_cross_entropy_with_logits_v2(labels=ys, logits=y_conv))

# 优化 下降调的大一点
train_step = tf.train.GradientDescentOptimizer(0.2).minimize(cross_entropy)
Comments | NOTHING